Making modular McKibben Muscles using a cleaner more precise technique
- Ali Shtarbanov
- Oct 9, 2025
- 8 min read
Updated: Oct 10, 2025
by Ali Shtarbanov
Difficulty: Medium
Duration: 40 min

Introduction
While there are many tutorials on how to make soft robotic McKibben muscles online, all the ones I've come across use are based on a very imprecise process that is also wasteful and more complex than it needs to be. A few years ago, when developing SleeveIO, I needed to make muscles of very accurate lengths with just 0.2mm precision, thus I devised a modified process to make this possible, eliminates the need for glue, reduces waste, and provides a very clean finished look by using two very specific secure knots.
In addition to the fabrication tutorial, at the bottom you will find a list of opportunities for how you can take this further through different variations you can try, as well as various projects you can make with McKibben muscles - including actual walking robots, especially when paired with the FlowIO Platform to have full programmatic control.
Prerequisite topics
Before starting the tutorial, it would be helpful to have general familiarity with artificial muscles. Here are some relevant resources you may check out first.
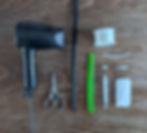
Materials & Equipment
• Kevlar String (thin)
• Inlet Cap
• Blocking Cap
• Hair dryer
• Silicone tube 2mm ID
• Clear plastic bag
• Syring or FlowIO device for actuation
Cost per actuator: <$1
Instructions

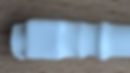
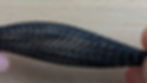
When unpacked, the braided sleeve will come bent and flattened. It must first be manually reshaped into a perfectly straight and cylindrical shape.

1. Fully straighten all bends and kinks by applying heat with a hairdryer on its highest temperature setting.

2. Work in sections to unflatten the sleeve by first applying heat, then pressing that section with your fingers to reshape it into a cylinder. Ensure that the cylinder shape is retained even after cooling down.

VERY IMPORTANT: Always keep the sleeve fully extended lengthwise and don't compress it longitudinally at any time during or after the unflattening process! This can be done by tying something heavy to one end and let it hang by gravity. Ensure that the diameter remains uniform. If you compress it lengthwise, you will lose the elasticity and your actuator will not work.

3. Cut off the neck of the long balloon.

4. Cut the balloon to a length approximately 3cm-larger than the desired soft-length of your muscle actuator. Soft-length does not include the rigid end components. In this case, we're making a 4-cm actuator, we need a 7cm long piece of balloon tube.
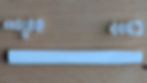
5. Choose the type of inlet and stopper connectors that you will be using for the actuator. There a two version of each you can choose from (socket or plug).

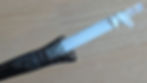
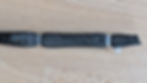
5. Insert an inlet connector on one end of the balloon tube, and slide is about 1cm into the tube as shown on the photo.
6. Insert a stopper connector on the opposite end of the balloon tube and also slide it down about 1cm into the tube.

7. Measure the separation between the barbs of inlet and stopper, then keep pushing the stopper connector further into the tube until the distance is exactly equal to the desired actuator length - which in this example needs to be 4cm.
8. Watch the following video, where I show you how you a simple way to tie a single and a double constrictor knot. You will need both of those knots for subsequent steps of this tutorial, so practice them a few times around your index finger.
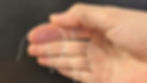
9. Using a very thin yet strong string (e.g. Kevlar), create the single-constrictor knot around your index finger using the process shown in the video.

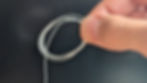
If done correctly, at one step of the process you will see a structure that looks like a butterfly.

Carefully slide the entire knot out of your finger, without undoing it.

10. Slide the prepared knot over one end of the actuator, right behind the barb, then tighten it strongly. Cut any excess string very close to the knot. IMPORTANT: Do not put a second knot or additional wraps. This is already a secure knot, and you must save the limited the space for later.

11. Tie the same type of knot on the opposite end of the actuator, then also cut the excess string as close to the knot as possible.

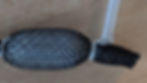
12. Open up one end of the braided sleeve slightly, while being careful not to fray the ends or to unravel the braiding.

Find a hand technique that allows you to hold sleeve with just one hand in such a way that the opening is slightly expanded by compressing the braid longitudinally between your fingers on the same hand, causing the diameter to increase as shown on the photo.

Now with your other hand, insert the plugged side of the balloon into the braided sleeve.
Ensure that the end is inserted at least one centimeter into the sleeve before proceeding to the next step.


13. Insert the balloon fully into the sleeve by using the following 5-step technique:
(1) Squeeze the front of the sleeve that is already over the balloon with the right hand.
(2) Squeeze the part of the sleeve that is just behind the ballon with your left hand.
(3) Push the back of the sleeve forward, making the center to move over the balloon.
(4) With your left hand and sleeve itself, grab the stopper end of the balloon and hold it.
(5) Let go of your right hand to allow the sleeve to spring forward over the balloon.

14. Repeat the same process until the balloon is fully inserted, even 1-cm past the inlet. This part will be a bit tricky, because the inlet is protruding from the side, and you must insert it without unraveling the braid.
Now make a hole through which the inlet opening can poke through, again being careful to not unravel the braiding.

15. Sinter with a lighter the front of the sleeve for just one to two seconds to keep it from fraying.


16. Use the Kevlar string to now create the double constrictor knot around your index finger as shown in the video above. This process is similar to before but slightly more complex because you end up with four loops of string.
Carefully slide the prepared knot out of your finger and keep it together.

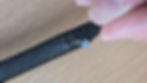
17. Position this knot over the braided sleeve, to first tie the inlet-side of the sleeve. The knot should go right behind the barb, similar as before; however, you now have to feel by touch where the barb is because it's not clearly visible.

Tighten the knot very well, while also being careful not to break the string. Don't cut the string yet, because we'll also make a zip-tie knot on top of this one.
18. Watch this video to learn how to make a zip-tie knot, then practice it a few times.

19. Take the two ends of the string remaining after the double constrictor knot and tightly wrap each of them around the muscle. Then make the zip-tie knot to finish off the inlet side of the actuator. Tighten it as much as possible.

20. Cut the excess string ends right at the base of the knot.
21. Ensure that the free end of the balloon inside the braided sleeve is fully straight and that it is not twisted tortionally. The balloon should in its relaxed state and be neither compressed, nor stretched, nor twisted left or right.
22. Follow the same process to tie the other end of the muscle - first with the double-constrictor knot, followed by two tight wraps, followed by the zip tie knot, which you must tighten as much as you can. Then you cut any excess string very close to the knot to have no loose ends.
23. Use a syringe to test the muscle for leaks and for irregular actuation behavior. If a problem is found, fix it before proceeding to the next steps.

24. Compress the remaining sleeve behind the actuator and then cut it off with a sharp-tip scissor very close to the knot to minimize waste.

25. Do the same for the front-side as well.

26. Fray-out the excess braiding on both sides of the actuator.

27. IMPORTANT: Put the actuator inside a large clear plastic bag, which will serve as a protective shield for your eyes, mouth, and lungs and for the people around you when cutting the excess braiding.
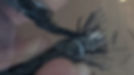
Using a scissor or snippers with a very thin sharp tip, start cutting the frayed-out braiding, while keeping it inside the bag. Ensure that the opening is not directed at your face or at any other person, because the tiny plastic pieces will become projectiles that can easily dislodge into the eyes, mouth, or respiratory tract, or into soft materials thus becoming like needles later on. Ensure that nothing leaves the bag!

28. You must continue cutting the excess very close to the knot, as close as possible, while also ensuring you don't cut the string or the balloon. If more than 1mm remains, it's too much and you must cut it even closer, again, always inside the bag!

29. Flip the balloon ends over to cover both the rough edges and also the knots. If the balloon is too long on one side, you should also cut it a bit too. This now results in a very clean-looking finish for your McKibben muscle actuator and also protects the knot from accidentally becoming undone.

30. Confirm that all still works well.
Variations and Things to try
Improvements and Modifications
Is there something you can improve in the making process?
What are some modifications you can make to obtain a different outcome?
What other types of connectors could you use? Maybe at different angles too?
What would happen if you also had a knot in the middle of the actuator, but which still allows air to flow through it?
Make something Interesting
The inlet and stopper connectors are specially designed to give you muscles that are modular and that can be connected to either one another or to other things. What kinds of assemblies can you make with several actuators? What other things can you attach these actuators to to make something interesting? Can you make something that walks? Can you make a hinge that opens and closes something? How about a balancing table? What if you also consider adding straws and sticks between the actuators? Can you invent some games? Take 10-15 minutes to sketch out as many ideas as you can think of!
Actuation with FlowIO
Pick some of your best ideas from the previous part, assemble them, and make them do their intended action by actuating your creations with FlowIO. Try using both the graphical user interface and also the programming interface. See if you can make something that walks!
Multi-Chambered Structure
• Make an actuator with two or more chambers, each with its own tube for air supply.
Make something useful
• Can you make a gripper based on this approach? What about a set of pliers?
• What other useful item or a "tool" can you develop out of this approach?
Find its limits
• What is the maximum amount of mass your actuator can lift?
• How many actuation cycles before something breaks?
• What is the lowest operating temperature for this actuator?
Interactive Art
• Dynamic shadow art
• Kinetic art