Making Origami Soft Robots from Low Cost Household Materials
- Ali Shtarbanov
- Apr 30, 2023
- 4 min read

Updated: May 1, 2023
by Layal Barakat, Ali Shtarbanov
Difficulty: Elementary
Duration: 20 min


Introduction
This tutorial demonstrates how to create simple origami soft robots / artificial muscles out of very low cost household materials that are readily available in most people's homes. Three examples of such soft robots are presented in this tutorial with variation in behavior or fabrication process. Those examples serve as demonstration of this generalized approach and fabrication process, which can be adapted - through change of fold patterns, materials, and shapes - to create origami soft robots of various different sizes, actuation behaviors, force output, aesthetics, and capabilities.
In addition to the basic 20-minute tutorial, at the bottom you will find a list of numerous opportunities for how you can take this to the next level through various variations you can try, modifications, advanced projects based on this approach, as well as resources for how to extend this line of research further. While the basic tutorial is short, the additional resources and suggestions included in the end can keep you occupied for many days and weeks.
Prerequisite & Background topics
Prior to starting the tutorial, you can try familiarizing yourself with the following prerequisite topics and terminology by browsing the resources linked under each item.
• Origami
• Muscles
• Origami-Inspired artificial muscles (video)

Materials & Equipment
• Thick paper / cardstock
• Scissors
• Tape
• Small weight (e.g. battery)
Cost per actuator: $0.20
Instructions

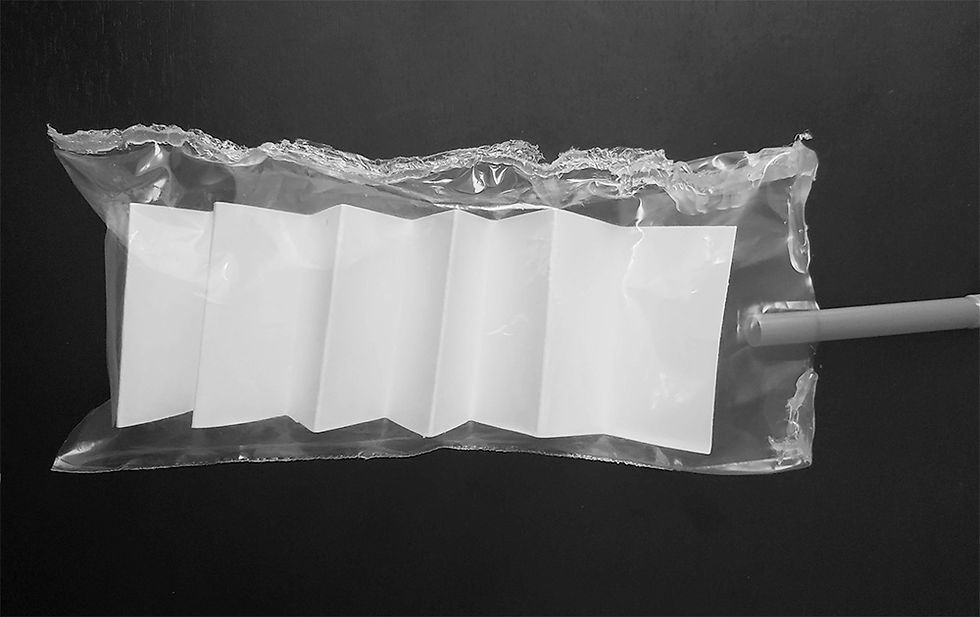
1. Cut a strip of cardstock and fold it accordion style.

2. Take a sandwich bag that is larger than the folded cardstock. Or prepare a piece of cardstock small enough to fit inside the bag when folded. See the image on the right for reference.

3. Cut off the zip closure of the bag, and then cut the plastic further if needed to a size that would just fit the folded strip. Keep two of the edges uncut.

4. Seal the long edge with tape, such that no air can escape through there.

5. Insert the folded cardstock through the open edge. Then seal that edge with tape as well, leaving some space in the middle for a straw as shown.

6. Use the glue gun to seal the area around the straw by putting a ring of glue around the straw and pushing down until it makes contact with the plastic bag.

7. Attach the battery to the end of the plastic bag. ry removing air from the bag via the strap. You have just made an artificial muscle actuator!
This artificial muscle provides linear travel range of 2 inches and can lift small objects under 100 grams.
Variations and Things to try
Alternative Sealing approaches
Rather than with tape, you can also seal the sides of the bag using heat-based approaches, such as with a heat sealer, soldering iron, or even the heat of your glue gun. Shown on the right is the result of using the hot glue gun for sealing,

Alternative Fold structures
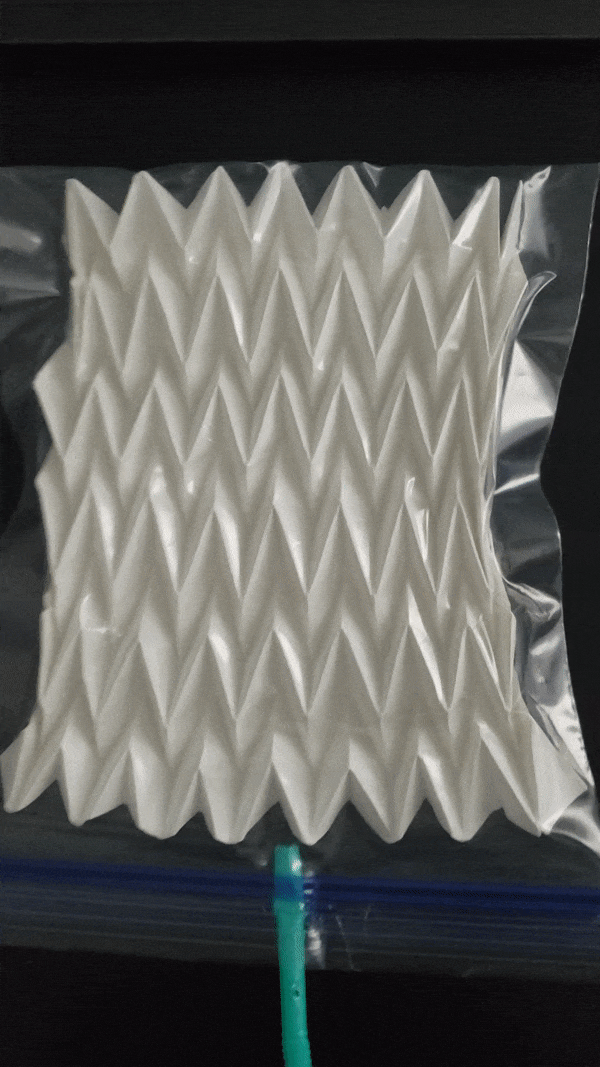
Try a different origami fold. A herringbone tessellation example is shown on the right, and the tutorial for this type of fold can be found here. You can find many other origami tessellation tutorials online.
Alternative Materials
• Besides cardstock, you can also try cardboard, resume paper, or aluminum foil. How does the material choice influence the actuation behavior, travel distance, and force?
Appearance variations
• Create an amination effect by drawing something on the paper, such that the image changes between the folded vs the unfolded state.
• Use an opaque bag to add a layer of mystery around how the actuator works.
Alternative Tubes
Rather than a straw, you can try using a flexible tube. You can also try using a narrower or a wider tube for slower or faster actuation, respectively.
Multiple sheets
• Try putting two folded sheets with different origami pattern next to each other in the bag.
• Layer two or more sheets and then fold them as a unit.
• Layering of very thin sheets of paper allows you to create your DIY cardstock of any thickness you want. Though in that case, you may need to glue / tape them together.
Bag Shape Variation
• Cut the bag or seal it into a nonrectangular shape to drastically change the actuation behavior without changing the fold structure.
• Put a partial seal in the middle of the bag and distribute the origami around the seal. Try different types of seal shapes - line, cross, triangle, trapezoid - to see how they alter the actuation behavior.
Multi-Chambered Structure
• Make an actuator with two or more chambers, each with its own tube for air supply.
Make something useful
• Can you make a gripper based on this approach? What about a set of pliers?
• What other useful item or a "tool" can you develop out of this approach?
Find its limits
• What is the maximum amount of mass your actuator can lift?
• How many actuation cycles before something breaks?
• What is the lowest operating temperature for this actuator?
Interactive Art
• Dynamic shadow art
• Kinetic art
Post-requisite topics & Going beyond
The resources below are meant to allow you to go deeper into this topic, learn about closely related sister topics, or proceed to the next logical topic based on the skills and knowledge obtained from this article.
Comments